In order to make this Christmas become more into the Christian, we decide to attach some sentence from bible along with the decoration.
After many time of effort trying to make the end point of garland curl, we determine to gave them bone, so the can curl in the way we want,
These wreaths was inspire by mommity website. We recycle the trow away color paper to made them.
My coworker built this cardboard Christmas tree while I in charge of another part of decoration. They say they follow the instruction they found on internet, but I cannot find the source.
It was the busy period of my life, just three months but many things had happen and I had too much things to handle. So I summarize all my crochet works in this post.
JUNE
This little hat just came up because I just felt like crochet something after tried day.
Head part of Pikachu.
In this month I started other new order at the same time as Pikachu.
And Baymax, the first doll that I ship outside my own country.
JULY
In this month I can only managed to finish only this set of doll.
AUGUST
Little beanie for baby named Orca.
Another Chowder, now I cannot remember how many chowder hade I made until now.
Finally finish this massive Pikachu. If you want the Pikachu pattern just go straight to my craftsy store.
Christmas is coming!! This year also my work place still holding Christmas decoration competition ! And the most exciting things is my department just got 2 new recruits, and those 2 are really into the competition. So we decide to take the challenge!
Today I gonna share how I make little angel for tree decoration.
Because the silver paper is really thin, so I fold them together with normal 700 grams white paper. In the picture I cut paper into size of A6.
Then fold the paper to cone shape.
I use a straper to hold the shape but you can glue them together. And press the upper part (above my thumb).
Draw a circle for angel's head and cut it out.
Fold the paper to make angel's wing and attach every parts togethet.
I add more color paper and try to make wing look differently with layer color.
I made all 5 angels for this year Christmas tree. Fast and easy.
Due to my plan to study abroad, I cannot work on made to order crochet anymore. So I decide to try making a video tutorial for my friends who have to learn how to crochet for themselves from now on.
The basic crochet starter are all over Youtube, so I will just straight in to the pattern and tutorial for them.
This is my first video, I found a lot of unpleasant after I upload it. Even though my friend said that this is not that bad.
For the next one I will try to at least make it fit full screen.
Pattern Notes
-sc is single crochet
-sc2tog is decrease single crochet
-sl is slip stitch
-ch is chain
Macaron pattern
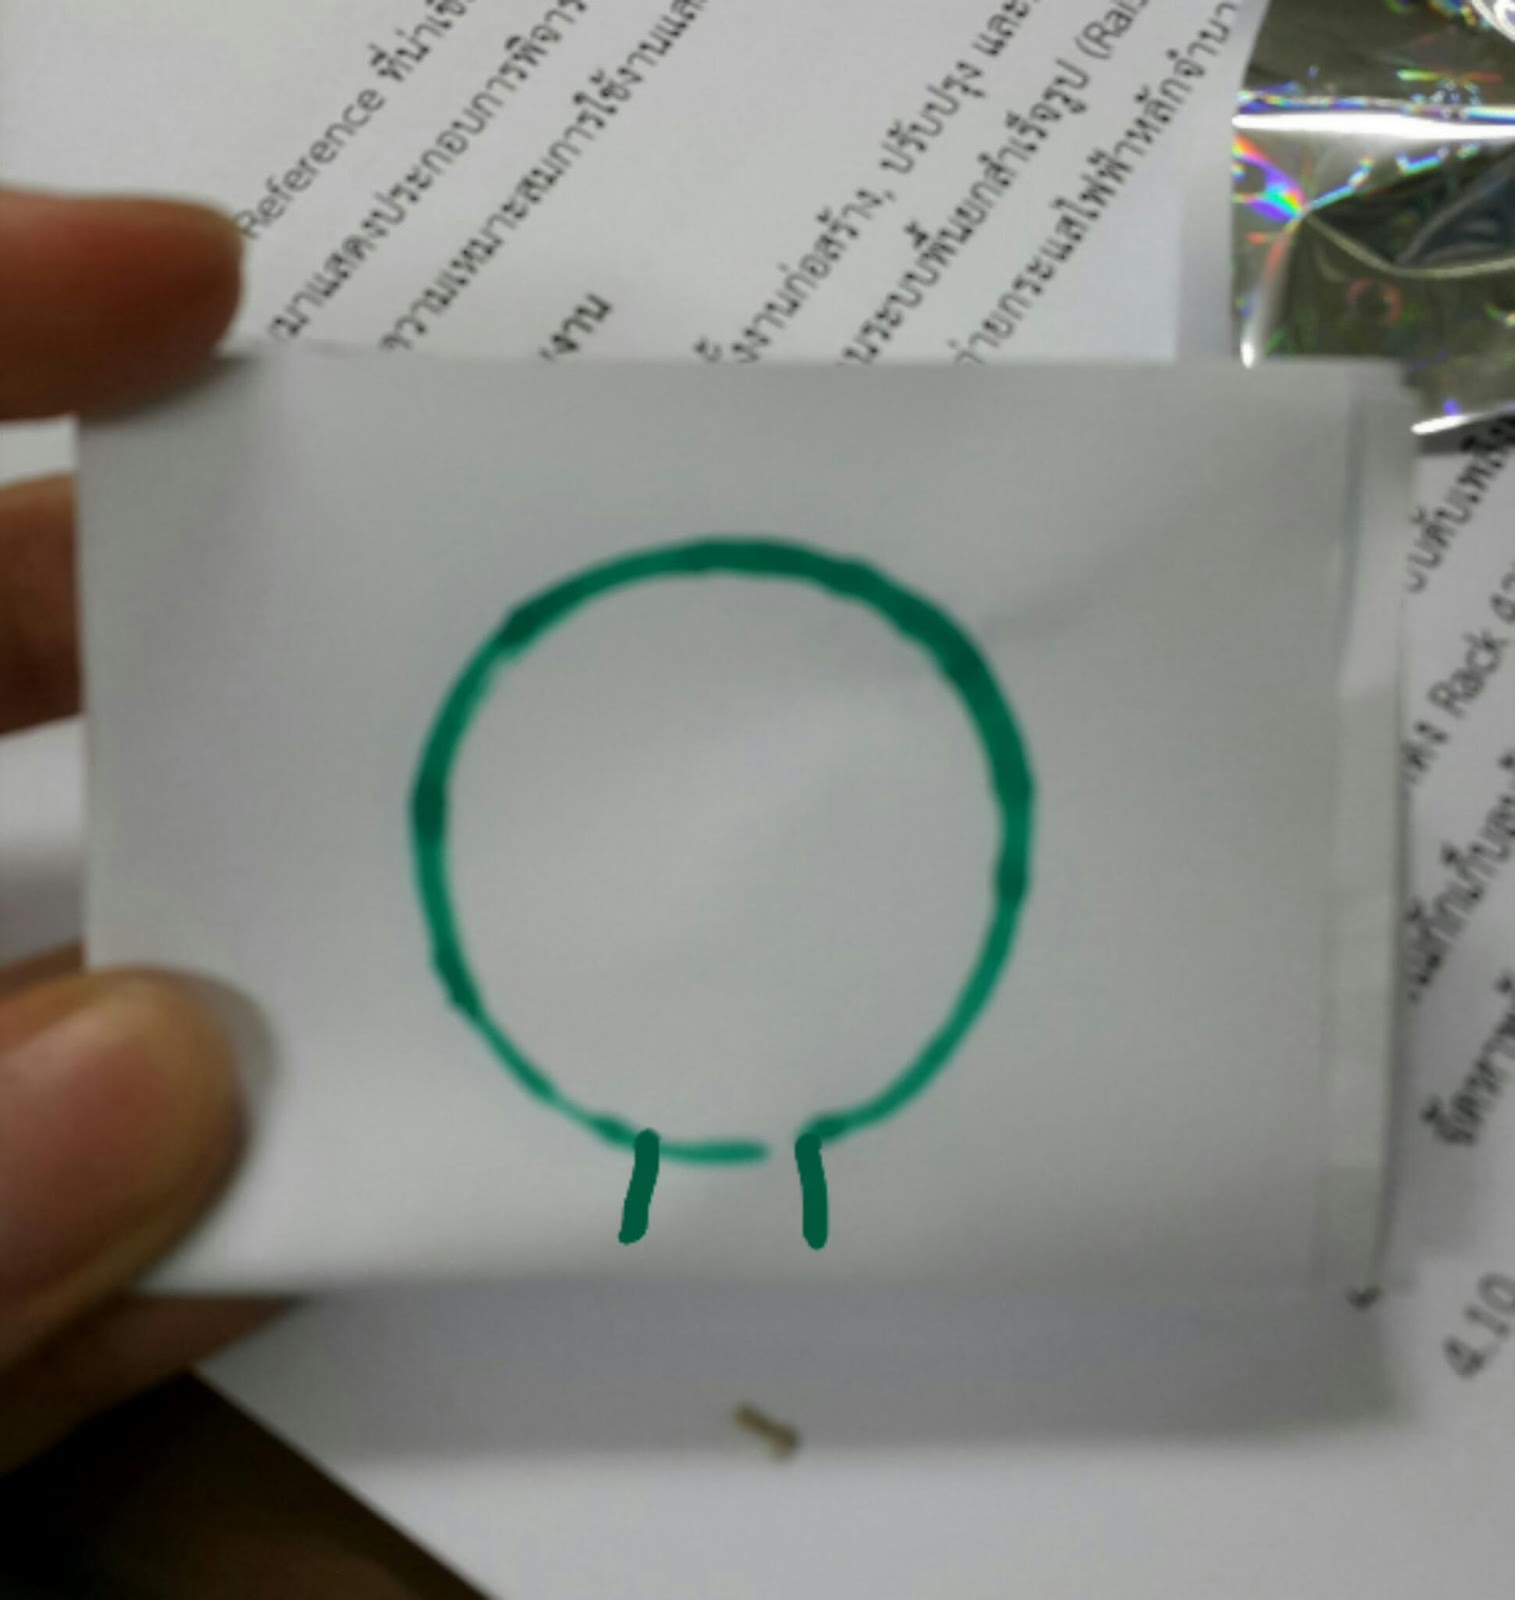
Rnd 1: Make an adjustable ring and work 6 sc in the ring, sl :: 6 stitches
Rnd 2: 1 ch, [2 sc in next stitch] 6 times, sl:: 12 stitches
Rnd 3: 1 ch, [sc in next stitch, 2 sc in next stitch] 6 times, sl:: 18 stitches
Rnd 4: 1 ch, [sc in next 2 stitch, 2 sc in next stitch] 6 times, sl:: 24 stitches
Rnd 5: 1 ch, [sc in next 3 stitch, 2 sc in next stitch] 6 times, sl:: 30 stitches
Rnd 6: 1 ch, sc in next 30 stitch, sl:: 30 stitches
Rnd 7: 1 ch, sc in front post for next 30 stitch, sl:: 30 stitches
Fasten off
Make 2 pieces
Filling pattern
Rnd 1: Make an adjustable ring and work 6 sc in the ring, sl :: 6 stitches
Rnd 2: 1 ch, [2 sc in next stitch] 6 times, sl:: 12 stitches
Rnd 3: 1 ch, [sc in next stitch, 2 sc in next stitch] 6 times, sl:: 18 stitches
Rnd 4: 1 ch, [sc in next 2 stitch, 2 sc in next stitch] 6 times, sl:: 24 stitches
Rnd 5: 1 ch, [sc in next 3 stitch, 2 sc in next stitch] 6 times, sl:: 30 stitches
Fasten off
After finish crochet every parts, sewing them together. Alternatively, you can also glue them, if you really hate sewing, but be careful not to put too much glue, so it not clearly visible and reduce chance to dirty other part.
Hope you enjoy the pattern, any problems during making him, comment below or under tutorial video. I will try answer you as fast as I can. :)
-If you crochet one of my doll please show me, I would love to see it.
What you want me to crochet next leave the comment below. :)
-If you face any problems during crochet this leave the comments under the video.
I will answer you as fast as I can. And we can share the solution with others.
The written pattern is on my blog : http://amigurumipianosound.blogspot.com/
My other Free Crochet Patterns are also on my blog.
******SELLING THE DOLL YOU MADE******
Visit private policy for more detail: https://amigurumipianosound.blogspot.co.uk/p/pattern-poly.html
*/*/* Helping translate from English to other language here: http://www.youtube.com/timedtext_cs_panel?tab=2&c=UCO6B-ObiFoh3cOemJQfoSJA
--------------------------------
FOLLOW ME ON
Youtube : https://www.youtube.com/channel/UCO6B-ObiFoh3cOemJQfoSJA
FACEBOOK: https://www.facebook.com/pianosound
Instagram: https://www.instagram.com/amigurumipianosound/
BLOGGER : https://amigurumipianosound.blogspot.com/
--------------------------------
SUPPORT this channel through:
Patreon :https://www.patreon.com/AmigurumiPianosound
Or purchase my paid pattern at
Craftsy : https://www.craftsy.com/user/2234916/pattern-store
ETSY: https://www.etsy.com/shop/Pianosound
RAVELRY : http://www.ravelry.com/patterns/sources/noramon-drons-ravelry-store/patterns
Finally after I had crochet that Pikachu 3 years ago, I have a chance to re-crochet him again.
I am not exactly follow the pattern because this Pikachu is a little smaller than the one I did in the past.
The left one was crochet follow my pattern which I still don't have time to finish him, and right one is this the head of Pikachu below, you can see the different in size.
I am very proud of this Pikachu, even tough he smaller than pattern original one but this still is a big size amigurumi doll. I don't have much chance to make a big one like this due to my present work and many factors. I have to thank to my customer from from Canada that he made this decision to order me to made this Pikachu for him. What a nice experience.